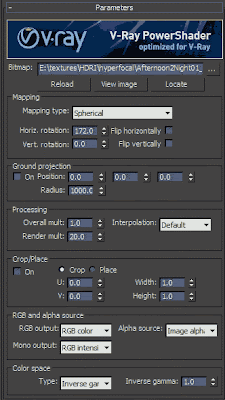
Menggunakan HDRI dalam melakukan render dapat lebih terlihat nyata dan realistik. Karena dengan menggunakan HDRI suasana yang terdapat dalam hasil render akan seperti tampak pada backround. Berikut ini kami berikan tutorial cara menggunakan HDRi timelapse dari hyperfocaldesign.com
Using Hyperfocals time lapse HDRI’s in V-Ray is a simple process, especially with V-Ray 3. Chaos Group have added a “sequence” checkbox while importing via the V-Ray HDRI map and they have also made Brute Force rendering much faster which is essential when working with Time lapse HDRI's. If you'd like to follow along you can download free time-lapse sky samples here.
The following is my current method, I'm still testing other primary GI options to see if I can use something other than Brute Force, although I am getting fairly reasonable frame times anyhow. V-Ray HDRI map I use the V-Ray HDRI map to import my HDRI sequence. If your using a quality HDRI such as those available at Hyperfocal you shouldn't need to adjust gamma or anything and as such my settings are pretty much default. I leave my overall multiplier at 1.0 so I can see it clearly and align it in the viewport, then I set the render multiplier higher which should be adjusted in reference to your camera exposure settings.
Dome Light
I then add the V-Ray HDRI map into the dome light in the texture rollout. Again the settings are pretty much default. I just make the Dome light invisible as I like the option of being able to select the alpha channel (if I'm choosing to render the sky with the beauty pass) so I can adjust the sky in post. If your using a good quality HDRI you shouldn't need to supplement it with another direct light.
Rendering
At this stage, Brute Force as the primary engine is my preferred method, with Light Cache as the secondary engine. I leave Brute Force as default and check on adaptive tracing, pre filter and the other check boxes in the pre filter rollout. I have been leaving the light cache on single frame instead of pre-rendering it in flythrough mode as I would normally for animation. The reason is that the flythrough pre-render doesn't take the lighting changes into account as the time lapse progresses and thus your secondary GI would only take into account the lighting in the first frame. I haven't had any problems leaving it on single frame and it only takes a few seconds per frame to render but if someone has a better method to calculate the secondary pass (without resorting to Brute Force and killing render time) I would be glad to hear it.
Antialiasing I typically like to let the Antialiasing handle the amount of grain rather than mess with the noise threshold etc. The following image shows my usual settings, I would drop the color threshold if I was getting too much grain in the image.
Kamis, 02 Oktober 2014
Tutorial Penggunaan Timelapse HDRI Pada V-Ray 3
Tags
# Tutorial
About bang 29
Soratemplates is a blogger resources site is a provider of high quality blogger template with premium looking layout and robust design. The main mission of templatesyard is to provide the best quality blogger templates.
Tutorial
Labels:
Tutorial
Langganan:
Posting Komentar (Atom)


![Download ACI Building Code 318-05 free [PDF]](https://blogger.googleusercontent.com/img/b/R29vZ2xl/AVvXsEgsywKixdk0IsgiCofG29JXaUcBY_oNot8APqW3EoZlmCxZulLtxgHuSjAZvFF48fgmGpyBB4Q66ISq5I02gj3ncIxxKGZgz-x1A_HOcGeo5yVXSV90VnNHpaL2bg8PhcOFlOf6guegSZs/s72-c/steel2.png)

![Method Of Strengthening R.C Slab After Deflection Using Over Lay Method [VIDEO]](https://blogger.googleusercontent.com/img/b/R29vZ2xl/AVvXsEjuMTMcYvovb0EWW1oTirqbUXq4bzC89kszR38SMYCWp3F6P143MqnmP8EkjE6y1iJcVLYNOJ1tHMUY1-QBKFh9G6Qq7LlhnNh6fa_PQbbscJd5_El0surQUpnH4S1TNkx02T0iVY1IYvw/s72-c/Untitled.png)
Tidak ada komentar:
Posting Komentar